sponsor

sponsor

Slider

Videos

Vape Kits

Deals

Vape Tanks

Vape Mods

Giveaway

New Arrive

What Makes the Aspire Zelos 50W Mod So Exciting

If you are looking for a vape mod that will give you a unique experience, I think today's article will help you. Today I would like to introduce Zelos 50W Mod from Aspire. So what's special about it? Let's take a look.


 How is the performance of Zelos 50W mod?

The Zelos 50W mod is an ergonomically designed product, so there is no doubt that it will give you an extraordinary feel. And it offers three different colors for you to choose, I think any one can bring out your temperament. Zelos's size is very small, so it also gives you better portability. So the most important thing is that in such a compact volume, it even comes with a large capacity Lipo battery of 2500mah. With this battery, it can reach a maximum output of 50W. Not only that, it also comes with two adjustment buttons that allow you to freely adjust the voltage and output. 
In addition, these two adjustment buttons have many functions. The specific operation can be seen in the user manual. Zelos 50W mod also comes with a display, although the area is small, but important information you can see. What I have to say is that it also supports VV, VW, Bypass and TC modes to switch freely to meet your different vaping requirements. Yes, Zelos also supports USB charging, allowing you to have a quick charging experience.

So will such a versatile Aspire Zelos 50W make you excited?

Aspire K4 Kit Would Be A Good Choice If You Want To Try Vaping


If a friend who wants to try vaping asks me how to choose a device, no doubt I think I will recommend it to him for a pen style starter kit. Then it is the K4 Quick Start Kit from Aspire.


How is the performance of K4 Kit


For consumers who want to try vaping, the biggest concern is the fear that they are not used to vaping. So the best way to deal with this problem is to start with pen style's vape kit. First of all, K4 is similar to traditional cigarettes in terms of styling, so it will not feel uncomfortable when used. And it's really small, so you can take it anywhere you want. Compared to before, you need to get a box of cigarettes, but now you only need to take a pen. K4 kit consists of K4 battery and K4 Tank. The overall design is very small. The Aspire also offers two different colors, you can choose your own favorite one.


 The K4 battery is powered by a 2000mah built-in battery, which protects you for long periods of vaping. Of course, it comes with a USB charging interface that makes charging easier. It is equipped with a 510 thread interface, which means it supports replacing 510 thread Tank.
K4 Tank has 3.5ml of smoke oil storage space, allowing you to reduce the number of times to add smoke oil. Most importantly, with Cleito Coils, it will give you an extraordinary direct to lung experience.


I think the Aspire K4 Quick Start Kit will be a good choice for you who want to try vaping. What do you think?

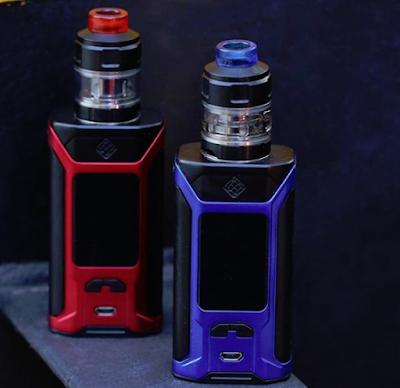
Wismec SINUOUS RAVAGE230 User Manual


How to use:
1. Power on/off: Push forward the battery cover and put two high-rate 18650 cells into the battery body. Press the fire button 5 times in quick succession to turn the device on and off.
Note:
(1) Please adjust the wattage to a proper range to match the atomizer you used before using.
(2) Please be careful not to use battery with torn shell for safety.

2. Display on/off function: While the device is on, press the Fn button, this will turn the screen display on/off. When the display is off, regulatory buttons will not work to prevent accidental adjustments.
3. Key lock function: While the device is on, simultaneously press the two regulatory buttons. This will switch between Key Lock and Key Unlock function.
4. Micro USB port function: The USB port can be used for charging and upgrading firmware. It is better to take out the cells and charge them through external charger.
5. Switch the display mode: By pressing the left and right regulatory buttons simultaneously in shutdown state, the screen display will rotate 180 degrees. You can then view the screen from two kinds of angle through this operation.

General Settings:
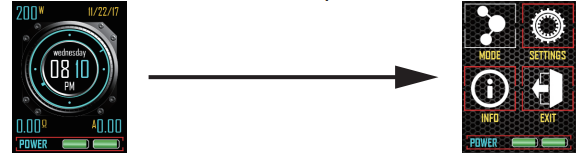
1. When the device is on, press the fire button 3 times in quick succession to enter the main menu.

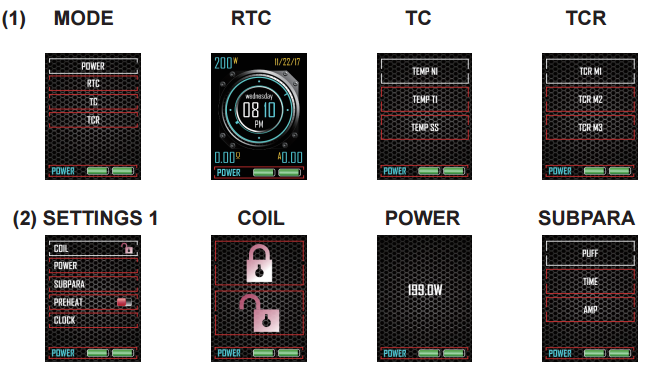
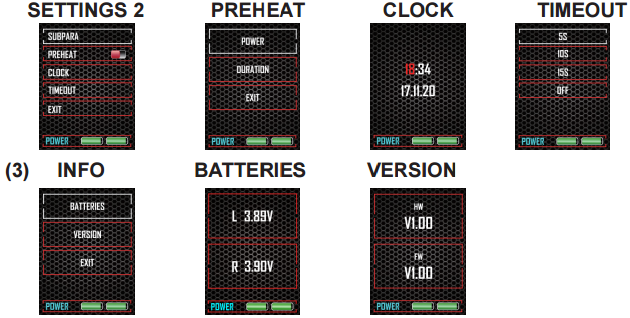
2. Press the left or right regulatory button once repeatedly to shift among (1) MODE, (2) SETTINGS and (3) INFO. Press the fire button to confirm. Under their sub-menus, you can choose vaping mode, set parameters, turn on/off certain functions and so on in the same way (press the left or right regulatory button to adjust and press the fire button to confirm).

3. After settings are complete, just move the EXIT or press the Fn button to go back to the main interface.

Supplementary Instructions:
Parameter Settings: Under VW mode, the wattage can be adjusted by pressing the regulatory buttons, right to increase and left to decrease; Under TC/TCR mode, the temperature can be adjusted by pressing the regulatory buttons, right to increase and left to decrease.
Note:
1. The TC-SS mode is suitable to SS316 coil.
2. When using normal coil or the resistance of coil you used is higher than 1.5ohm in TC modes, the device will automatically switch to POWER mode.
3. When Kanthal coil is applied under TC/TCR mode, the device will also automatically switch to POWER mode.

Sub-parameters: Under SUBPARA menu, PUFF (total vaping puffs), TIME (total vaping seconds) and AMP (current amp) are included. You can choose one of them to be displayed on the main interface.

Clock Setting: Under SETTINGS-CLOCK menu, you can set the time and date by pressing the right regulatory button to move and left right regulatory button to adjust.
Note:
1. When the device is on, you can select the RTC mode under MODE-RTC menu. And you can check the time on the main interface.
2. When the device is powered off, you can check the time and date by pressing the fire button one time.

Preheat Function: Preheat function allows the device to quickly heat up the coil at a higher wattage with certain time limit. This function only works under VW mode.

Timeout Duration: Once the duration is set (like 5 seconds), when you hold the fire button and vape over the pre-set time, it’ll display “OVER 5S PROTECT” and shut down automatically. Press the fire button 5 times to restart.

About TCR Mode: In TCR (Temperature Coefficient of Resistance) mode, users can set the parameters according to the TCR of coil.
Following is the TCR value range for your reference:
Note:
1. The TCR value in the sheet is 105 multiplied of the actual TCR.
2. The TCR value range is 1-1000.

Malfunction Indication and Protection:
No Atomizer Alert: When the device does not detect an atomizer, the OLED screen will display “NO ATOMIZER FOUND”.

Atomizer Low Alert: When the resistance of atomizer is lower than 0.1ohm in VW mode or lower than 0.05ohm in TC modes, the OLED screen will display “ATOMIZER LOW”.

Atomizer Short-circuit Protection: When atomizer short-circuit occurs, the OLED Screen will display “ATOMIZER SHORT”.

Temperature Alert: If the internal temperature of the device is over 70°C, the output will shut off automatically and the screen will display “DEVICE TOO HOT”.

Temperature Protection: In TC modes, if the actual temperature of coil reaches the set temperature, the device shows “TEMP PROTECT”.

Weak Battery Alert: In VW/TC mode, when the device installed with an atomizer is working and the voltage of battery is below 2.9V, the device shows “WEAK BATTERY”. Meanwhile, the output power will be reduced accordingly.

Low-voltage Protection: When the voltage of the battery is below 3.3V, the screen will first display “BATTERY LOW” and then “BATTERY LOW LOCK”. Charge the battery to unlock the device.

Imbalanced Alert: When the difference between the maximum and minimum cell voltage is equal or greater than 0.3V, the OLED screen will display “IMBALANCED BATTERIES” after inserting the USB cable. Then please take out the cells to charge or replace with freshly charged cells.

Check USB Alert: When the voltage of the USB charger is equal or greater than 5.8V, the OLED screen will display “CHECK USB ADAPTER” after inserting the USB cable or vaping.

Charge Error Alert: When no current is detected in charging state, the OLED screen will display “CHARGE ERROR”.

Check Battery Alert: When one of the cells is not installed correctly, the OLED screen will display “CHECK BATTERY”.

What Could We Do If The Atomizer Leaks From The Mouthpiece Or Atomizer Base?

If the liquid is leaking from mouthpiece, it means there is liquid inside vent pipe. In this case, please detach the atomizer firstly and gently swing the atomizer tube to clean the liquid out from the pipe(also you can use the cotton cloth or cotton swab to dry the pipe), then assemble the atomizer and keep pressing the fire button several seconds without inhaling to atomize the residual liquid completely.


Note: Please make sure to refill the liquid into the correct space (not the vent pipe in the center of atomizer tube) and make sure every inhaling is complete (the time of inhaling should not be too short, otherwise the liquid may not be atomized completely) If the liquid is leaking from the atomizer base, please check if the sealing part of atomizer is OK and be sure the liquid level is between 10%-90%. Also you must make sure the atomizer is assembled tightly.

Crazy Smoke Circle 2


Do you envy the vapers who can blow large smoke circles? This video is about the large collection of smoke circles.


Crazy Smoke Rings 3


This is a video on how to blow good smoke circles. Follow the handsome boy and you can blow smoke circles easily.


Vaporesso Tarot Mini Quick Guide


Tarot Mini Kit by Vaporesso maintains the extremely beautiful design of Tarot family, capable of 80W output with one 18650 battery (sold separately) . Equipped with the OMNI board, you could easily switch between Smart VW/VT/TCR/CCW/CCT as well as bypass to different vaping experience at your preference. The control face features the same user friendly design with fire button, display screen as well as adjustment buttons. Its mini design makes it easy to carry around. With a
revolutionary easy coil replacement system, you could change the coil outside of the chamber even on a full tank. The top airflow system destroys leakage and dry hit related issues leaving you only with the essential. It adopts the ECO Universal Coil so that you only need to replace the EUC inside without changing the metal sleeve,that is truly ECO friendly and makes vaping more affordable.
Tarot Mini Mod, Small and Smart!

How To Use
Switch On/Off:Press the fire button 5 times in quick succession within 2 seconds to turn the device on. In the same way, the device will be powered off after 5 presses.

Vaping: Hold the fire button and inhale through the mouthpiece. Release the fire button and exhale.

Screen Display: After switch on, OLED displays voltage, resistance value, battery level, temperature, output wattage; the display will shut off if unused for 20s, the screen will be relit by pressing the fire button.

Automatic atomizer recognition: The mod will read the coil's resistance as soon as the connection is detected. It will also recognize coil type, when a kanthal coil is used, the mod will shift from TC to wattage mode automatically.

Adjustment buttons lock/unlock: Keep pressing mode button and “+”button simultaneously for two seconds when the device is powered on, then the up and down buttons will be locked and the screen will display “SYSTEM LOCKED”. In the same way, pressing the up and mode buttons can be unlocked and the screen will display “SYSTEM UNLOCKED”.

Switch display mode: Keep pressing up button and down button simultaneously for two seconds ,the screen display will rotate 180degrees.

Switch vaping modes: Long press the mode button for three seconds to switch among VW/VT(Ni200, SS, Ti)/ Smart / TCR / BYPASS / CCW / CCT modes.

Charging: Plug in the Micro USB cable to charge the battery, OLED display current battery level (0%,20%, 50%, 80%, and 100%), The display will remain lit while charging.

Firmware update and customizing: Can be updated and customized through a simple software that can be downloaded directly from our website. The software will be made to run on Windows systems and will be available in English. It will also include a “help” sections for urgent questions. The directions on how to use our software will be found on our website and Facebook page.

Adjustment of Air Flow: The top airflow system can be adjusted with slight twisting motions of the top lid which will not loosen its attachment to the pyrex glass.

Filling E-liquid: This easy top-fill tank will only ask of you to screw out the lid and fill in the chamber when the base is securely shut.Be sure to safely position the glass part when this process is in place to avoid spillage.

Changing Atomizer: Unscrew the base to simply remove and insert a new
atomizer whenever needed. Pull the EUC out from the base and insert a new one.
Screw the Base on. Wait after replacing to make sure the coil is well primed.
Item 10 to 12 only apply to Tarot Nano Starter Kit

How to Set the Mode
1) Smart VW mode: As an advanced Variable Wattage mode, Smart VW will guarantee your mod’ s ability to skillfully select the adequate average wattage for your atomizer, according to its resistance reading, automatically. As for any regular wattage mode, however, you will be given able to change the wattage according to your taste all across the scale.

2) In CCW mode: While on VW mode, press the mode button three times consecutively to select CCW. Select and hold down the mode button to confirm and to implement any modifications to the wattage line using the plus and minus buttons (Ramp up time and consequent performance); move on to the next bar with a quick press of the mode button. When all modifications are final hold pressed the mode button to save and exit.

3) In TC-Ni/TC-Ti/TC-SS/TCR(M1, M2) Mode: When set in TC-Ni/TC-Ti/TC-SS mode, the device can separately support Nickel 200, Titanium, and 316 Stainless Steel coils. In TCR (Temperature Coefficient of Resistance) mode, the device can support different temperature control coils within different TCR value ranges and you can set the TCR at different values within proper range.

The Setting of TCR Mode (M1,M2):
When set in TC-Ni/TC-Ti/TC-SS mode ,and the device is powered on, you will enter into the TCR (M1,M2) set menu, by clicking mode bottom 3times:
1. Press mode button to choose among M1, M2;
2. Press the up or down button to increase or decrease the TCR value according to the material of the coil you used;

Following are different TCR value ranges for different coils for your reference:
Note:
1.The TCR value in the sheet is 10 multiplied of the actual TCR.
2.Our total range of TCR value is 1-1000.

Adjust temperature: In TC-Ni/TC-Ti/TC-SS/TCR(M1,M2,M3) mode, temperature can be adjusted from 100-315℃ or 200-600℉ by pressing up button or down button, up button to increase and down button to decrease. Each press of the up or down button will increase or decrease the temperature setting by 5℃ or 10℉. Long press up button or down button can rapidly increase or decrease temperature setting.

Lock/Unlock resistance: In TC-Ni/TC-Ti/TC-SS/TCR(M1, M2) Mode, press the "-"and mode button simultaneously for 2s will lock/unlock the resistance level, “ ” will appear on the display. Attach a new atomizer will not change the locked resistance.

Automatic atomizer recognition: To achieve better temperature control effect, the mod will ask the user if the new atomizer is attached. " OLD LOAD: -, NEW LOAD: + " will appear on the display. If a new atomizer is attached, press " + ", the mod will read new resistance; if not, press " - ", the mod will read at locked resistance.

4) In CCT mode: While on any TC mode, press the mode button three times consecutively to select CCT. Select and hold down the mode button to confirm and to implement any modifications to the temperature line using the plus and minus buttons (Ramp up time and consequent performance); move on to the next bar with a quick press of the mode button. When all modifications are final hold pressed the mode button to save and exit.

5) In Bypass mode:Direct output voltage system is applied in Bypass mode. The higher the batterylevel is, the higher the output voltage is. When set in this mode, the device can support a coil whose resistance is within the range of 0.05-5ohm.